OS-11_中断
# 中断
Tags: #OperatingSystem
我觉得我对UNIX进程管理一直迷迷糊糊的原因就是还是对中断与上下文切换迷迷糊糊, 学习的顺序没有理清.
我们来重新梳理一下:
# 硬件
- UNIX v6++ 建立在x86平台上面, 下面的叙述都是基于 x86 的
# 中断控制器
中断需要硬件支持, 即中断控制器, 用于处理外设中断
中断控制器相当于CPU的秘书, 将各种外设发送来的中断请求汇总(考虑优先级), 一个一个地传个CPU进行处理
- 在MIPS架构里面, 中断处理器对应协处理器0, 即CP0 CP0_CoProcessor0_in_CPU
- i386的中断控制器由两个串联的
8259A芯片构成: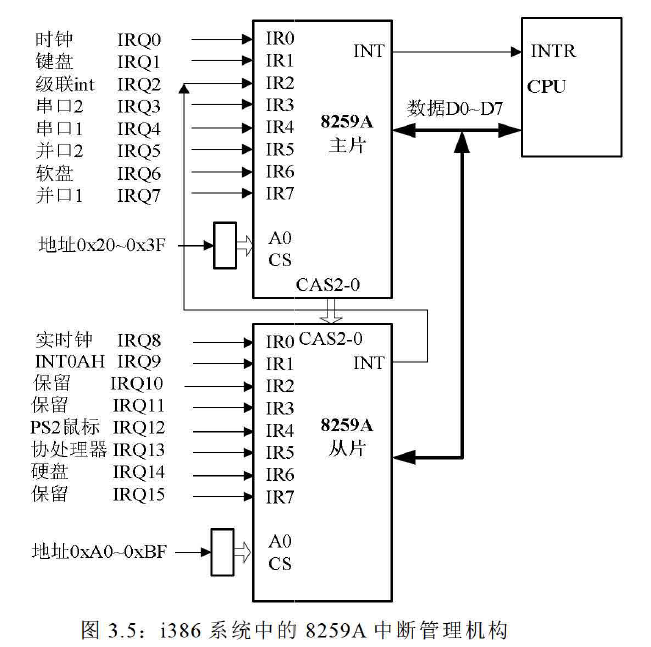
中断控制器保存当前进程的优先级, 以此判断是否应该发送新的中断请求, 这个优先级存放在中断控制器的"处理机优先级寄存器"里面
MIPS 里面 对应Status寄存器: Status register
在i386里面倒是没有单独的处理及优先级寄存器, 而是用CS寄存器(代码段寄存器, 在CPU里面)的最后两位代表当前进程的优先级(Current Privilege Level, CPL)
# 中断控制器如何与CPU交互?
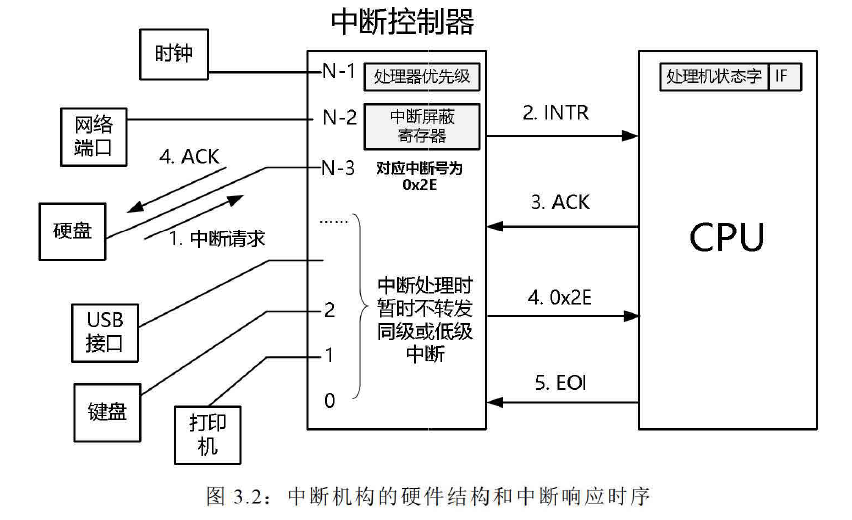
注意:
- CPU需要回送Accept信号(ACK)
- CPU需要回送中断完成的信号(EOI, End of Interrupt)
- 中断控制器也在向硬件回送ACK信号
# 软件
# 中断描述符 / 中断门
中断门存放对中断的描述数据:
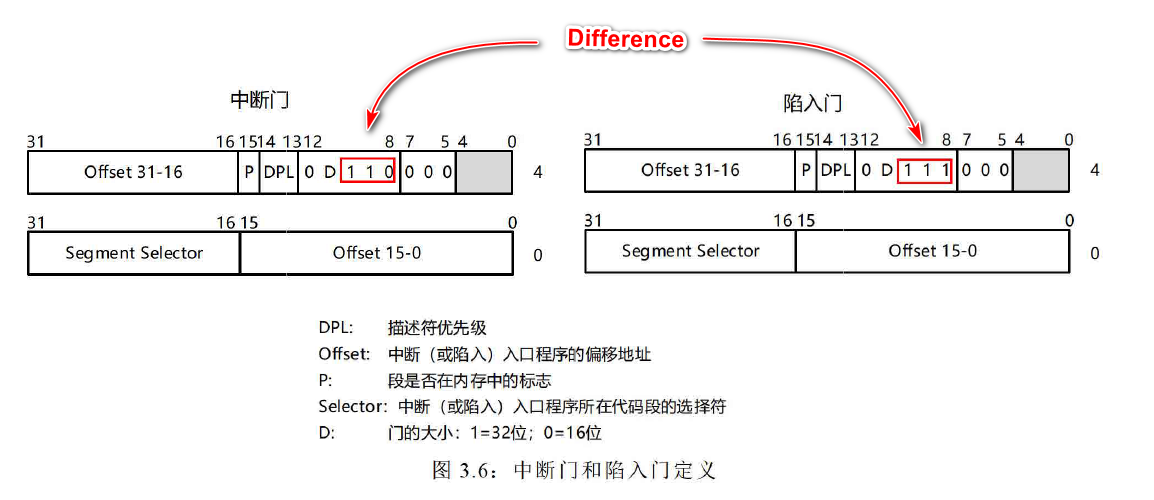
- 数据存在哪里?
- Offset Segment Selector
- 一些标志位
- DPL: Descriptor Privilege Level 描述符优先级
- P: 段是否在内存中
- 等等
# How it works1
- CPU 在中断发生时将 Segment Selector 装入CS 寄存器、Offset 装入EIP 寄存器,这样就跳转到了相应的中断入口程序。
- 由于中断门和陷入门中selector 字段的最后两位为00, 所以一旦将 selector 装入CS后,无论中断发生前处理器处千何种运行状态,执行中断处理程序时,处理器均在核心态运行。
- 前面提到过, i386中, CS寄存器最后两位作为处理机状态字
# Interrupt Gate In UNIX v6++
| |
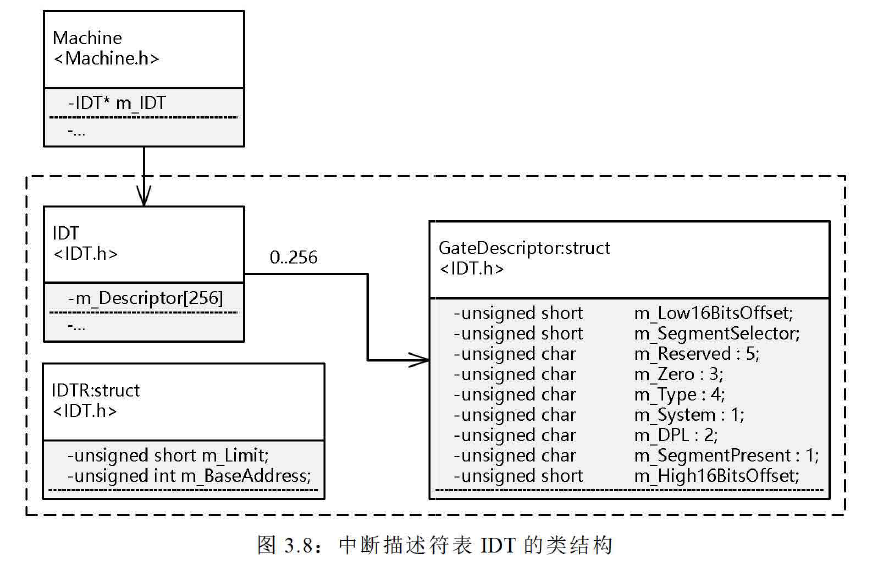
# IDT 中断描述符表
IDT: Interrupt Descriptor Table, 里面存放了所有的中断, 异常, 系统调用描述符
- 系统启动后, IDT 常驻内存,位置不变,它的基地址和长度登记在 CPU 内的IDTR 寄存器中。
# IDTR
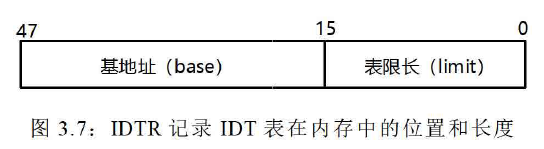
- IDTR 长 48 位: 高 32 位保存IDT的基地址,低 16 位保存 IDT 的长度
| |
# IDT in UNIX v6++
# 初始化
- IDT对象是Machine类里面的私有成员:
| |
- 在系统启动的时候, 实例化Machine对象, 同时调用
InitIDT将IDT表加载进内存, 调用LoadIDT将IDT基地址和长度加载进IDTR寄存器
| |
# 如何初始化IDT表
在IDT类里面只实现了"设置单个描述符"的功能:
| |
InitIDT: IDT表的初始化是在Machine类里面实现的:
| |
我们单独看其中一项:
| |
可以看到, 这是键盘中断, 中断号是0x21, 中断入口程序是KeyboardInterruptEntrance:
 后面会介绍一个中断的完整流程.
LoadIDT: 将长度与起始地址存入IDTR
| |
# 中断处理
我们有了一个完整的IDT表, 现在来看看一个中断的具体流程是什么.
# 中断隐指令2
- CPU在接收到中断信号之后, 首先需要使用IDT表, 读取里面的信息. 这个过程是中断隐指令自动完成的.
- 中断隐指令其实并不是指令, 而是由硬件(CPU)自动完成的.
- 中断隐指令完成了从"CPU接收到中断信号"到"进入中断入口程序"这一段的转换, 在UNIX v6++里面没有这一段的代码, 因为这是CPU硬件完成的内容, 不是操作系统的工作
# 中断隐指令的过程
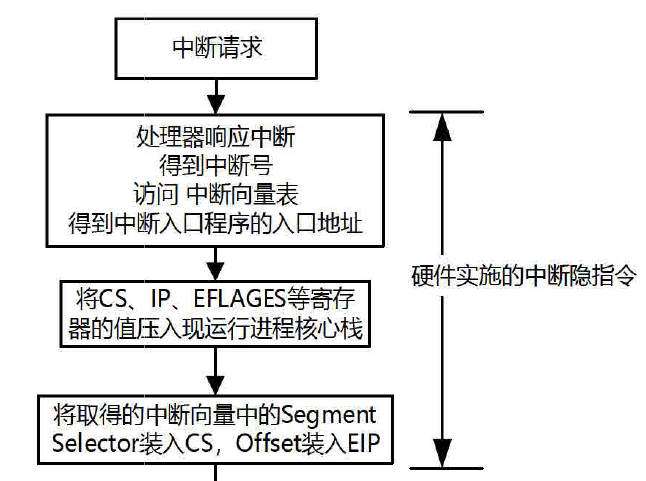
- 查询IDT, 获得相应中断源的中断门
- 关中断
- 现场保护
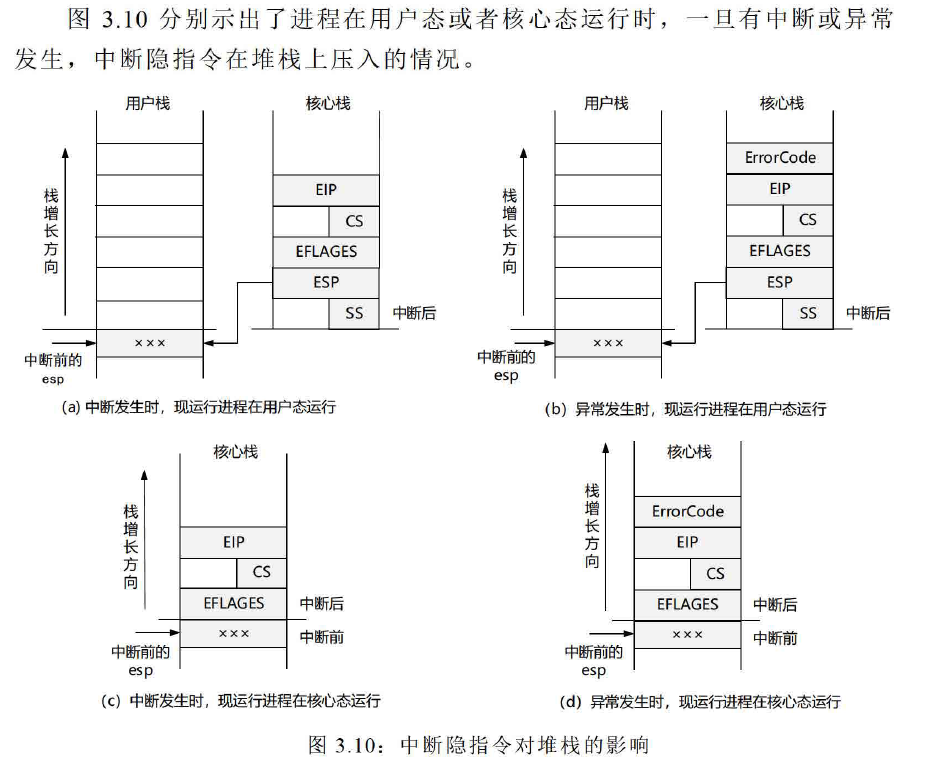
- 将当前 EFLAGS 、CS 和 EIP 寄存器的值依次压入栈( 如果中断前,进程运行在用户态,还需压入 SS 和 ESP 的值)
- 对于会产生出错码的异常,除了将基本的EFLAGS 、CS 、EIP 压入堆栈之外,还会在后面压入一个ErrorCode
- 中断隐指令保存的现场称为硬件现场
- 装入中断描述符
- 将取得的中断门中的Segment Selector 装入CS, Offset 装入EIP。之后,CPU 将转入执行各种中断入口程序
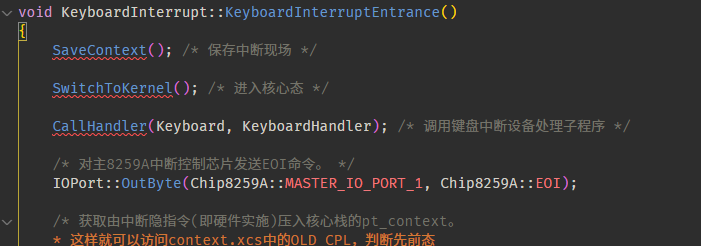
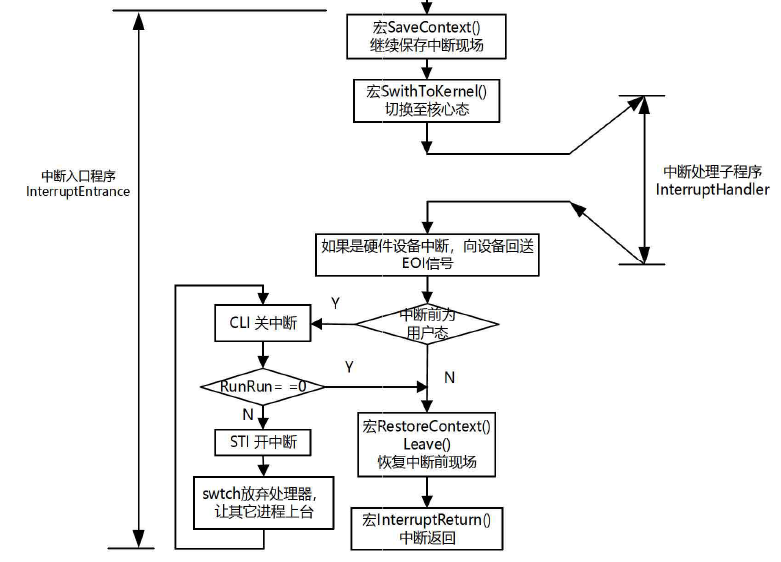
# 中断入口程序 Interrupt service routines (ISR)
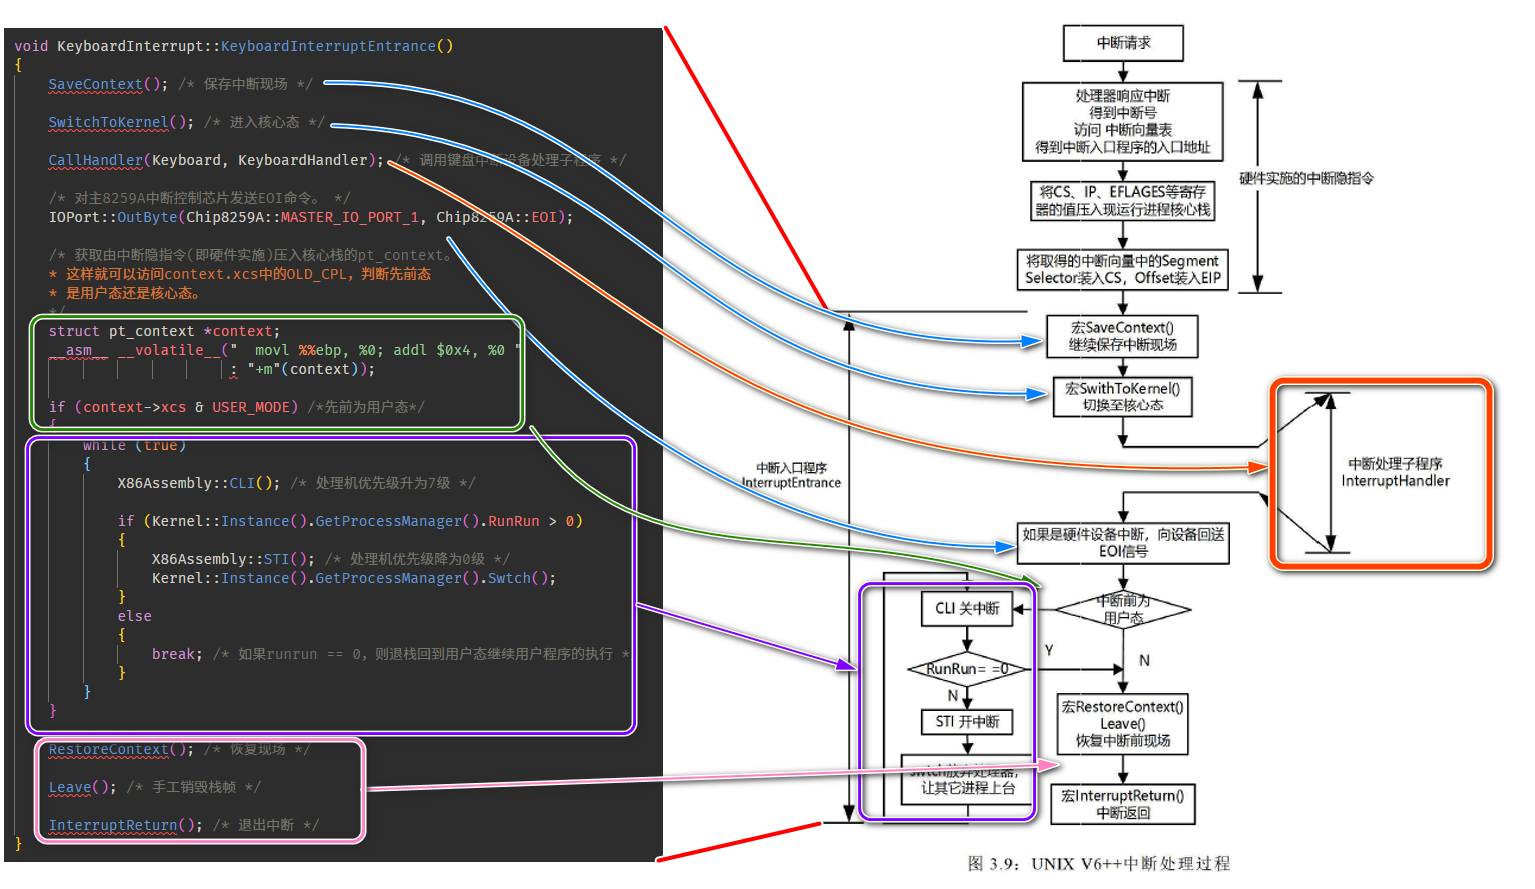 中断入口程序负责以下功能:
| |
- 每个子程序的具体作用参见学校讲义, 上面比较详细
- 下面是自己补充的说明:
- 其中第三步
CallHandler(Class, Handler);是不同中断区别最大的地方, 不同的中断根据IDT表有不同的中断处理子程序.
# 比较不同的中断入口程序
- 代码: 比较不同的中断入口程序
- 外设中断需要在中断处理子程序返回后发送EOI信号, 这是最标准的中断流程.
- 时钟中断的特别之处在中断处理子程序Clock里面:
- 时钟中断发送EOI在中断处理子程序里面, 因为时钟中断有一些很费时间的工作, 不能等到这些都完成了才继续接受中断
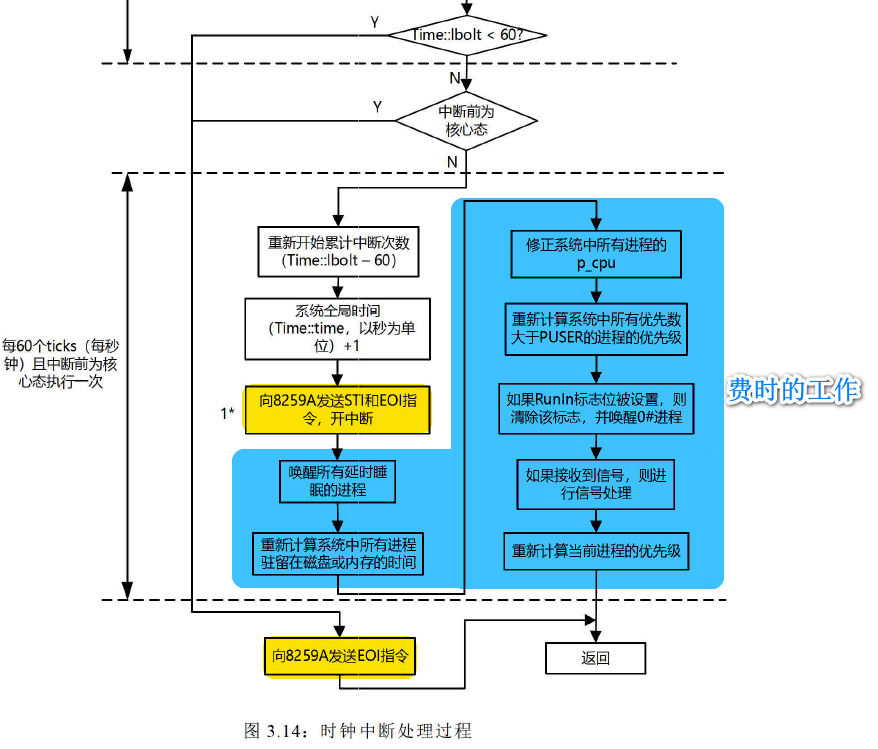
- 时钟中断发送EOI在中断处理子程序里面, 因为时钟中断有一些很费时间的工作, 不能等到这些都完成了才继续接受中断
- 系统调用的特别之处只在中断处理子程序Trap里面, 因为系统调用不涉及外设, 所以不需要发送EOI
- 异常的中断入口程序最为特别
- 首先异常没有例行调度
- 其次因为异常的中断隐指令可能会压入ErrorCode, 所以在恢复现场的时候需要跳过ErrorCode.
还有不知道为什么,Unix v6++里面的异常的入口程序都是用宏定义的- Unix v6++里面用宏定义是为了一次性定义大量的入口程序, 这样比较简洁.
# 中断处理时的中断保护
中断的优先级处理是完全由中断控制器决定的, CPU不考虑这个问题
CPU只有一个IF标志位, IF标志位在EFLAGS寄存器里面, 它控制了CPU是否接受新的中断
IF==1, 表示接受中断(中断开),IF==0, 表示不接受中断(中断关)- CLI(CLear Interrupt)将标志位清零, 表示关中断
- STI(SeT Interrupt)将标志位置一, 表示开中断3
重要性: CPU的标志位IF>中断控制器的请求
所以如果一个中断A后跟着更高优先级的中断B, 而中断A还没有开中断, 那么CPU不会立即响应中断B.
- 中断的嵌套要在原子操作(不可分割的操作)以外进行, 即中断A完成原子操作以后, 开中断(STI), 再立即响应中断B.
其实中断还分为maskable和Non-maskable的中断, IF标志位只对Maskable的标志位有效, Non-Maskable的中断一般是不可挽回的硬件错误, 要求立即响应.4
# 中断嵌套的一些问题
- 现在关于中断嵌套有一些矛盾的说法:
# The ideal way

关中断。CPU响应中断后,首先要保护程序的现场状态,在保护现场的过程中,CPU 不应响应更高级中断源的中断请求。否则,若现场保存不完整,在中断服务程序结束后,也就不能正确地恢复并继续执行现行程序。
保存断点。为保证中断服务程序执行完毕后能正确地返回到原来的程序,必须将原来的程序的断点(即程序计数器PC)保存起来。
中断服务程序寻址。其实质是取出中断服务程序的入口地址送入程序计数器PC。
保存现场和屏蔽字。进入中断服务程序后,首先要保存现场,现场信息一般是指程序状态字寄存器PSWR和某些通用寄存器的内容。
开中断。允许更高级中断请求得到响应。
执行中断服务程序。这是中断请求的目的。
关中断。保证在恢复现场和屏蔽字时不被中断。
恢复现场和屏蔽字。将现场和屏蔽字恢复到原来的状态。
开中断、中断返回。中断服务程序的最后一条指令通常是一条中断返回指令,使其返回到原程序的断点处,以便继续执行原程序。
- 其中,1~3步是在CPU进入中断周期后,由硬件自动(中断隐指令)完成的; 4~9步由中断服务程序完成。
- 恢复现场是指在中断返回前,必须将寄存器的内容恢复到中断处理前的状态,这部分工作由中断服务程序完成。
- 中断返回由中断服务程序的最后一条中断返回指令完成。5
# Intel Manual6
在Intel Manual里面说明了以下几点:
STI CLI在仅在CPL<=IOPL的时候才能使用:
IOPL是EFLAGS里面的两个保护位, 用于保护IO

IF 中断标志位会被以下汇编指令影响:
- PUSHF, POPF, 将EFLAGS寄存器的值存入/弹出栈
- 进程切换会加载EFLAGS寄存器, 所以可能改变IF
- IRET指令执行和中断隐指令相反的内容, 包括弹出并恢复保存的EFLAGS寄存器, 所以也可能改变IF
- 当Interrupt是通过Interrupt Gate实现的时候, IF标志位会被自动清零(关闭maskable中断)
- 与此对应的是, 如果一个中断是通过Trap Gate实现的时候, IF标志位不会被自动清零
上面这一点是Interrupt Gate和Trap Gate的唯一区别:
- The only difference between an interrupt gate and a trap gate is the way the processor handles the IF flag in the EFLAGS register.
- When accessing an exception- or interrupt-handling procedure through an interrupt gate, the processor clears the IF flag to prevent other interrupts from interfering with the current interrupt handler.
- A subsequent IRET instruction restores the IF flag to its value in the saved contents of the EFLAGS register on the stack.
- Accessing a handler procedure through a trap gate does not affect the IF flag.
在Intel手册里面没有提到中断嵌套的问题, 根据上面的叙述, 一个Interrupt Gate发起的中断不会被其他中断抢占.
# Linux Assembly Language Programming7 - by Bob Neveln
- 8086的设计使我们能够用一种非常简单的策略来避免中断相互冲突导致的死锁与栈溢出. 我们可以在运行中断入口程序(ISR)之前自动屏蔽中断(IF == 0), 在ISR运行结束以后再结束屏蔽 (恢复IF原来的值).
- 这样, 对于两个连续的中断A, B, 中断控制器只需要一直向CPU发送中断B, 直到中断B被接受.
- 但是这种策略的效率较低, 较为缓慢的磁盘中断会阻挡其他更为重要的中断.
- 中断嵌套可以让高优先级的中断interrupt低优先级的中断, 要实现中断的嵌套, CPU和中断控制器都需要额外的工作:
- ISR需要在一开始利用STI将CPU的IF位置为1, 开启中断
- 中断控制器需要进行中断的优先级控制, 只向CPU转发比当前中断优先级更高的中断
- CPU需要在一个中断结束的时候向中断控制器发送EOI指令, 允许转发相同或更低优先级的中断.
# Interrupts - Stonely Brook University Slide8
Interrupt - Slide(@nim04interruptsStonely)
- 中断不应该被屏蔽, 所以Trap Gate进入的时候不应该关闭IF
# todo
- 看Lions里面原来的是怎么写的
- 加了STI试试
- 加了还是可以正常运行, 至少键盘中断是这样
- EOI在中断子程序之前?
# 中断处理子程序结束以后
- 值得注意的是, EOI
一个完整的例子; Basic x86 interrupts | There is no magic here
本笔记里面Unix v6++相关的内容均为同济大学操作系统课程相关资料 ↩︎
找了半天也没有找到中断隐指令的英文对应词, 许多资料都只是把它当作了 Interrupt service routines (ISR)之前的一步, 没有具体说明. ↩︎
我们常说的中断和异常到底是什么_AltlasClub_HERO联盟 这里所说的中断服务程序即前文中的中断入口程序, 也即ISR: Interrupt Service Routine ↩︎
64-ia-32-architectures-software-developer-vol-3a-part-1-manual ↩︎
Linux Assembly Language Programming (Open Source Technology Series) by Bob Neveln ↩︎
- Nima Honarmand